From High Dudgeon to Never Mind in 3 Easy Steps

I’m having an Emily Litella moment after harvesting my garden this morning and finding my round zucchinis this year look like a pale imitation of the round zukes I’ve grown in past years.   The seed that I bought from Urban Farmer clearly pictured nice round, dark green fruits on their website. (Of course I don’t need to tell you that zucchini is technically a fruit and not a vegetable but let’s not quibble about that, the main thing is that Zucchini should be GREEN.) 

You’ve all likely seen the paler ‘white’ zucchinis that are available year-round in grocery stores. I will buy them if I have no other choice and really need zucchini for something, but I never have grown them and never planned to add them to my garden.  They are a bit pear-shaped and often have less flavor, but they also seem to hold up better so it’s no surprise that grocery stores carry them all year, even in the depths of winter when real zukes are sad and rubbery and not worth buying.   Anyhow, I ordered that round zucchini seed from Urban Farmer and grew it on only to discover this week that it’s a pale green variety rather than the dark green one pictured and it’s too late to start over with different seed.

I was ready to call the company at my first opportunity to complain, especially after I steamed the first ones today and found them mushy, watery and tasteless.  Because there were so many ready to pick today, I also made up a batch of my Zucchini Soup.  I was expecting a disappointing, pale, thin soup lacking in flavor but:  Oh. My. Goodness.  For some reason when these babies are cooked down with a little olive oil and onion plus more than a little salt and then puréed with my immersion blender, they are transformed from watery, flavorless disappointment into creamy perfection featuring a lovely and robust but not overwhelming squash flavor undertone.

So, never mind Urban Farmer.  No complaints here. 

Oh, the 3 easy steps?  Harvest, cook up, taste.

Kufta – for the record

Kufta is an Armenian specialty dish that you really must learn to make at the elbow of someone who knows how, but if you do know how and are just not sure about ingredient quantities, here’s my most recent method:

Make the filling balls a few days ahead and freeze.

Filling:

  • 1 lb. ground lamb
  • 4-6 yellow onions (enough to fill my largest skillet), chopped into approximately 1/2″ size pieces in Cuisinart.  Be very careful not to over process the onions.  They need to be chopped, not macerated.
  • 3 cubes butter, 4 if the lamb is very lean.
  • 1/2 tsp salt.
  • Dried Basil–to taste, but at least 2 tablespoons

Melt the butter in a very large skillet and brown the lamb gently over medium heat in the butter, chopping it into every smaller pieces.  The best tool for this is a Chinese Wok Chuan/spatula/turner.  When the lamb is uniformly brown, stir in the onion.  The skillet should be completely full.  Begin cooking and stirring the meat and onions, reducing the heat as needed to prevent scorching of the onions.  Cook until the onions are greatly reduced in volume, transparent and no longer sending off much steam.  As you stir this filling, use the Wok Chuan to cut pieces of onion that are too large if you find any.  You cannot walk away from Kufta filling.  It takes well over an hour of constant stirring for the filling to reach the right consistency because you cannot allow it to brown.  Once you are satisfied that the onions are cooked down as far as they will go before disintegrating, add the basil and salt to taste.  Stir this thoroughly off the heat and place in a dish with a tight fitting lid and allow to cool a bit before covering and placing in the refrigerator overnight.  The next day, form the inner filling balls and place them on a wax-paper covered cookie sheet(s).  Cover gently with waxed paper and then with foil, sealing well.  Freeze these pre-made filling balls thoroughly.  Overnight is best.  They can hold in the freezer for a few days, but no more than a week or they will start to dry out and get freezer burn.

Keyma, or outer covering:

  • 3 lbs. leanest available ground beef, passed through the grinder a second time.  The butcher will complain about doing this but it makes ALL the difference.  He will tell you that the meat is already finely ground.  Just smile and ask him to please pass it through the grinder once again because you are making something special that requires the meat to be almost paste-like in its consistency.  If he tells you that you will lose some of your 3 pounds of beef to the grinder as it passes through, let him sell you a quarter pound extra.
  • 3/4 cup fine bulgur
  • 1 1/2 teaspoon salt
  • 1/3-1/2 cup water for mixing into the meat and more for dipping your hands while forming the meatballs

Mix all of this together very well, kneading in water as needed to achieve the proper texture of Keyma.  This cannot be described, it can only be shown.  You must knead the Keyma thoroughly and notice the way the texture changes as the bulgur absorbs water and the meat responds to the kneading.  If you’ve made kufta before, you can see and feel when the texture is right.  If you have not made kufta before, all I can say is that I hope you have a sweet Armenian grandma nearby to show you how to make it like I did.  Once the Keyma has achieved the proper texture, remove the frozen filling balls from the freezer and begin forming the Keyma in a consistent layer around the outer surface of the frozen filling balls.  Usually the ideal is to use a volume of Keyma approximately equal to the volume of the filling ball.  I form a flat patty in my hand, place the frozen filling on top and gently form the Keyma around the frozen filling.  A more traditional method is to form the Keyma into a ball and hollow out the center with the thumb of your opposite hand.  I have never been able to get this technique to work.  After you form the Keyma around the filling, use water to seal any edges together and smooth the surface of the Kufta.  Then place on another waxed paper-covered cookie sheet.  Work quickly as the frozen balls will begin to soften.  If they are frozen on more than one cookie sheet, only remove one sheet from the freezer at a time.  Having the filling balls made ahead and frozen makes the job of forming the Kufta much easier than the old method where the filling was only refrigerated and not frozen and you formed each filling ball as needed for each portion of Keyma.  That tip came from Ernie Darpinian via the Fresno Armenian Church Ladies.  The tip of using beef for the Keyma came from Laura Basmajian.

Minestrone, lots of it!

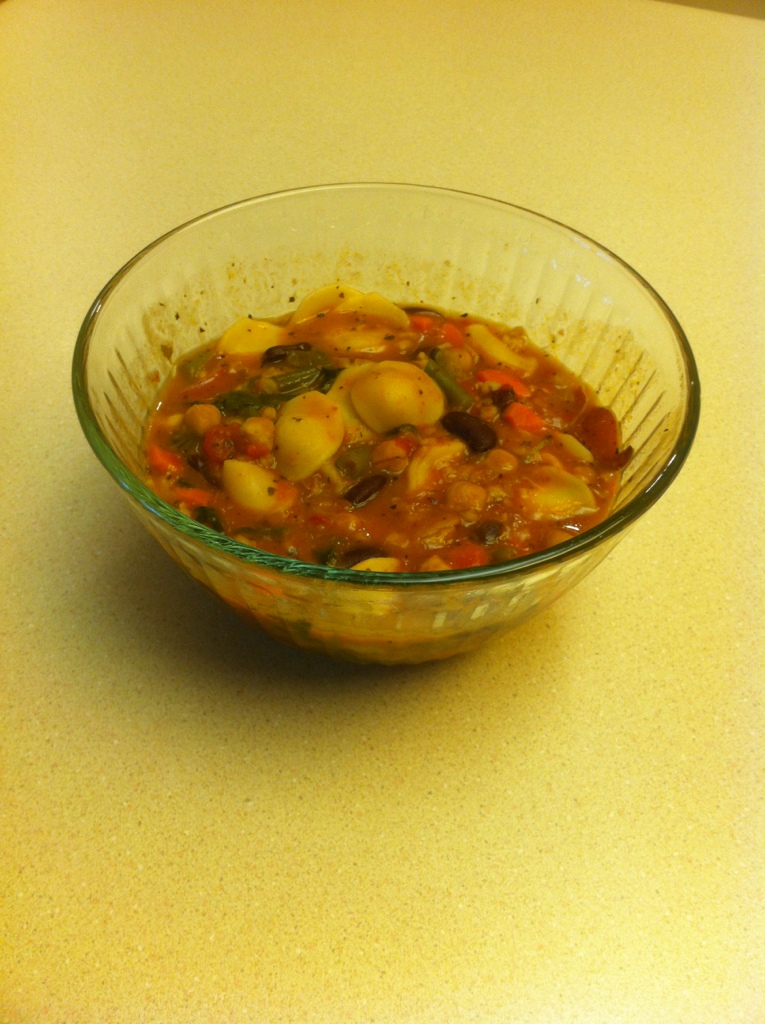
This is my most requested recipe.  I have codified it since my previous post and updated it since I had to double everything because you can’t get 8 oz. cans of Garbanzo and Kidney Beans anymore.  It makes enough to serve a very large crowd, or to freeze.  It freezes pretty well for a soup with potatoes in it, but when you reheat it, you have to make sure to keep stirring it as you reheat it or the tomato base will separate and be unsightly.  


Minestrone Soup


Base Ingredients:

1 onion, diced

1/4 c. olive oil

2 c. chopped celery

2-4 cloves garlic, chopped 

1 large can S&W ready-cut tomatoes (28 oz. size)

1 can tomato sauce (15 oz. size)

1 can garbanzo beans (15.5 oz. size), undrained 

1  can kidney beans(15.25 oz size), undrained 

Seasonings:

salt to taste (3-4 tsp.)

dash pepper

6 bay leaves

2 tsp. oregano

1 Tbsp. dried basil

The Secret Ingredient:

 1/2 cup barley

Vegetables:

2-3 chopped carrots

8-10 small red potatoes, chopped into 1/2 inch pieces

1 1/2-2 cups green beans, fresh, cut or broken into 1/2 inch pieces or frozen cut green beans

Greens:

1/2 of a head of finely shredded green cabbage, or spinach, or any other green you prefer.  I use 2 of the regular 10 oz bags of spinach from the grocery store or an equivalent amount from Costco.

Pasta:

1 1-2 cup noodles of choice I prefer orrechiette or rotini 


The Method:

Sautè onion and celery in oil until soft and fragrant.  Add tomatoes, tomato sauce and canned beans, seasonings (I know that seems like a lot of salt, but it’s a LOT of soup; definitely adjust to your preference) and 4 quarts water and bring all to a boil.  Add barley and return to boil. Cover and simmer for approx. 1 hour.  Add chopped fresh vegetables (but not the greens yet!) and return to simmer. Cover and simmer soup until vegetables are thoroughly cooked, another 45 minutes.  Keep stirring periodically and adding water as needed during the cooking process.  15-20 mins. before serving soup, stir in spinach or other greens and return to simmer, then stir in raw pasta and cook at a slow boil until noodles are thoroughly done.  Stir and check frequently at this point as you may need to add water. Serve when noodles are cooked.  You can keep this soup on the back burner for quite a while and it just improves as the flavors meld.  This can resemble anything between a thick vegetable stew to a broth-based soup depending on the amount of water used.  You will also have to adjust the seasonings depending on the amount of water.  Keep in mind that the barley and the noodles will absorb water and salt like mad.  As you might guess, it’s even better the second day, reheated.

This is a good recipe to get 10 year-old boys (or vegephobes of any age really…) to eat their vegetables.  Especially if you offer it with freshly baked bread.  A little freshly grated Parmesan or Romano cheese on top doesn’t go amiss either.


Harvest Proceeds Apace…

The garden continues to grow well.  In fact, this photo is about a week old and now you really can’t easily walk between the tomatoes and the cucumbers or the cucumbers and the squash.  Trellising cucumbers has its advantages, but it’s a lot of work to set up a trellis system and then keep training the plants up constantly, so the decision was made this year to let the cucumbers sprawl as Gary’s dad used to do.  The pumpkins are also creeping into other rows in the back.  I’d thought to train them into the back 40 there behind the garden, but they have a mind of their own and will not be trained.

We harvest daily and are getting crazy amounts of squash and cucumbers but nothing else so far.  I did see one reddening tomato today and an eggplant that’s ready to stuff.  I expect to pick that first garden-ripened tomato some time next week, making this a late year for tomatoes.  But once they get going, watch out!

Here’s what I’m doing with the excess zucchini and cucumbers:

Cream of zucchini soup, hold the cream.  This soup has only 4 ingredients:  one onion briefly sautèed in olive oil, gobs of cubed zucchini, and salt.  I throw all that in my largest stock pot and cook it down until the zucchini falls apart.  Then after it cools for a bit, I purèe it with the immersion blender I borrowed from Laura and freeze it in my Souper Cube Trays before I vacuum pack it:

Come December I’ll be glad of these little reminders of summer deliciousness!  For Gary, I’ve made traditional bread and butter pickles:

I personally am a dill pickle fan and I don’t know how to make those.  But this recipe calls for 10 pounds of cucumbers and that pretty much cleared out the excess cucumbers from this week, so HOORAY!  Maybe I will make one more batch this year.  We’ve planted a second row of cucumbers so we’ll be in cucumber heaven until the end of September if no gophers hear about it.  Mum’s the word.


In a real jam…

As I try to decide which is better: the no-cook freezer jam, on the left in the photo above, or the old fashioned cooked jam on the right. Certainly they look different at this point just after completion. Although the freezer jam is not technically complete since it sits overnight at room temperature so possibly the color settles down and darkens to look more like standard jam.

Conveniently, a small flat of strawberries (8 baskets) is the perfect amount of fruit to make one batch of each kind of jam so I thought I’d take a flyer on freezer jam this year as I’ve heard people singing its praises over the years but never tasted it or tried making it before. The p-b and j school crowd has no comment on this thorny issue other than a previously stated general preference for Grandma’s homemade jam over store bought.

A very limited straw poll among adults indicates that whatever one’s mom or grandmother makes or made is what people seem to prefer. If I start making both consistently, it will be a quandary in the future for my grandchildren. I have a sneaking suspicion there will be advocates on both sides with a slight edge for freshly made cooked jam.

All I know for sure is that anything made with the wonderful strawberries to be had at local stands all around us right now is going to be head and shoulders above what’s on grocery store shelves for berry-liscious good flavor.

Biscuits anyone?

Stuffed Vegetables

Armenian Stuffed Vegetables

Ingredients:

  • Any combination of vegetables that can be stuffed.  I use mammoth zucchini, standard eggplants, large Italian Sweet peppers if they can be had from a local garden and/or standard green bell peppers from the market.  
  • 1-2 pounds of LEAN ground round
  • uncooked white rice
  • dried minced onion or grated fresh yellow or red onion
  • dried basil
  • salt
  • one small zucchini (optional)
  • tomato sauce

So you may notice the list of ingredients is a bit vague as to quantities.  That is deliberate as I vary the amount of meat depending on the vegetables on hand and the crowd I mean to serve.  This is more a method than a recipe per se.  Here are the ratios I use when mixing the meat:  for each pound of ground beef use 1 teaspoon of salt, 1-2 tablespoons onion to taste, 1-2 tablespoons basil to taste and 1/3-1/2 cup rice also to taste and texture preference.  As with any recipe that adds filler (the rice) to ground meat, I believe the original intent was to stretch of a small amount expensive meat to feed a large and hungry family by adding much less expensive grain products to increase bulk.  That being said, I think there is a sweet spot for the amount of rice to meat that falls in the ratio I’ve given.   

Method:

Mix the filling ingredients together well: the meat, rice, onion, basil and salt and a little water.  2-3 tablespoons water should be about right.  The water helps everything to blend together well.  Knead this mixture with your hands in a large bowl as you would bread dough until everything is uniformly distributed and the meat and rice hang together well.  Set aside.

Now for the fun part: prepare the vegetables.  Get out a large stock pot roomy enough to accept the vegetables in a single layer if possible. Wash all the vegetables and begin with the peppers if you are using them.  Just cut off the tops of the peppers and remove and discard any membranes and seeds left inside.  Any good trimmings of flesh from the pepper top can be removed from the stem and tossed in the bottom of the pot.  This leaves you with a nice empty pepper cup to receive the meat.  Zucchini and eggplant next.  The pictures show eggplant because I made this batch in winter and eggplant is available all winter long in supermarkets but the method applies equally to the mammoth zukes:

First, trim the ends and slice the eggplant in to workable sections, about 4-5 inches long:

Next, use a coring tool to hollow out a cylindrical void in the center.  With zucchini, you can actually see a demarcation between the soft center where the seeds are forming and the more solid walls and that enables you to easily remove the core and leave about a 3/8 to 1/2″ wall of good solid flesh.  With eggplants, the flesh is uniform consistency all the way to the skin so you have to judge when to stop removing flesh.  Eggplants are a little softer so, you want to leave 1/2-3/4″ all around the edge as uniformly as you can:

  Any flesh removed gets tossed in to the bottom of the pot.  When you have prepped all the vegetables, begin stuffing the meat in to the cavities.  The rice will swell but the flesh will shrink as it loses water so everything evens out but you don’t want to over stuff the vegetables.  It’s best to turn the vegetables on their sides for cooking but if you don’t have room in your pot, arrange them any way you can make them fit.  Bell peppers should not be upside down or the meat will fall right out.  If you have too much meat for the vegetables, form large oval-shaped meatballs and drop them in on top of the vegetables.  Children will eat this dish if you tell them they can have all the meatballs and don’t need to eat the vegetables.  

Add tomato sauce.  For this batch, which is 4 bell peppers and 2 eggplants, I started with 1 1/2 pounds of ground round and used 2 small cans of tomato sauce.  Also, when I don’t have zucchini large enough to stuff and/or I’m using only peppers, I slice a small zucchini in to the pot as they are also available year ’round in supermarkets.  The zucchini and eggplant will release enough water from their flesh for the rice to absorb in cooking and then some.  Bell peppers will not release much water so if you are only using peppers and don’t have zucchini, you should add a little water with the tomato sauce.  You can see below that I’ve turned the peppers and 2 of the eggplants on their sides.  That is ideal, but the other 2 eggplants just wouldn’t fit so they are upright.

Bring to a boil over medium high heat.  Cover and reduce heat to maintain a strong simmer.  Simmer for a minimum of 2 hours, maximum of 3 hours, reducing heat as needed to maintain the simmer but not burn the vegetables.  About half way through the cooking time, remove the lid and carefully shift and turn the vegetables with 2 large spoons so that they cook evenly.  You can do this a few times as needed, and it’s especially important if you’ve had to stack the vegetables in the pot but don’t do it too often as it slows the cooking. If you’ve been able to place everything on its side, you should only have to turn them once.

Serve with rice or bulgur pilaf, pida or other soft bread to soak up the sauce and if you want to be very traditional, a savory yogurt sauce with garlic and salt provides a nice complement.

Processing…

Tomato time has arrived and it’s time to process these beautiful tomatoes from Christine’s Garden and make some Pasta Sauce and some Salsa again this year.

The basic processing is the same whether the end game is Salsa or Pasta Sauce:

First, wash and cut off the stem end and any spots and place on a broiler pan.
Then toast them under the broiler until the skins blacken. Somehow, this deepens the flavor. I don’t remove the skins or seeds. That’s where the most
Lycopene is.
After making purée in the food processor and making either Salsa or Pasta Sauce, I freeze the result in these Souper Cubes, which really are super.
Here are some of the frozen cubes popped out of their Souper Cube cells, pooped in to a Food Saver bag, vacuum sealed and ready to stack in the freezer. It’s a lengthy process for sure, but come December, that Pasta Sauce and Salsa made from Christine’s lovely organic San Marzano Tomatoes comes in mighty handy and tastes summer-fresh.

So Long Kitchenaid

Hello Ankarsrum! 

I still remember standing in line at Gemco when it was going out of business so that I could get my first Kitchenaid stand mixer at the best possible price over 30 years ago.  This was just after I’d sheared off the dough hooks on my Sunbeam Mixmaster that had been a wedding gift because I was trying to make 100% whole wheat bread.  Luckily, the glass bowl didn’t break and it didn’t destroy the mixer, but I knew if I was going to have a chance to make true whole wheat bread I’d need the Kitchenaid.  And back then, the Kitchenaid did not disappoint.   Early on I purchased the grain mill attachment and managed to seize up the motor when a rock slipped in with the grain and locked down the grinder.  Off it went to an appliance repair shop, where they actually fixed it (those were the days!) and that machine lasted over 20 years until it started really sounding tired.  So I bought another one.  What a sad difference.  The new one just couldn’t power through the bread dough.  Then I tried a Breville.  Same thing.  Then I tried a bigger, more expensive Kitchenaid with a “more powerful” motor.  Same thing.  A little online research turned up this new kid on the block, an Ankarsrum Assistant sold by Pleasant Hill Grains, and King Arthur Flour.  I bought mine from Pleasant Hill because at the time they were having a sale.  It seemed an extreme amount to spend on a mixer at the time, even on sale, and possibly a mistake because this mixer uses a completely foreign concept in mixing techniques.  But I was desperate to find a mixer that could power through the stiffest possible bread dough and bring it to supple perfection without grinding to a halt and/or smelling like smoking motor grease.  Done.  This beast laughs at 100% whole grain bread dough.  It also does a fine job with cookies and cakes and everything I do with a mixer.  Unfortunately, although it has lots of accessories it doesn’t have a spiralizer, so I had to keep my Kitchenaid just to make Zoodles with the Spiralizer Attachment and that’s okay because I was able to make space for it and so far it can manage to run that attachment without complaint.  But if you think you want to make 100% whole wheat bread, do not hesitate, the Ankarsrum can manage whatever dough you throw at it, our current favorite being Featherpuff Bread from the Laurel’s Kitchen Bread Book.

A word on whole wheat.  You really do want to grind it yourself unless you have a miller in town who grinds fresh flour daily.  Yeah, I thought not.  You will be amazed at the difference in your bread if you grind your own grain and bake it the same day.  The flavor is incomparable.

Bon appétit!

Cabbage Dolma Redux

The how, the why and the joys of creating this most satisfying family soul food, updated with more photos and instructions on how to prepare the cabbage.

  • Ingredients:
  • 1-2 heads of green cabbage

    1-2 pounds of lean ground beef
    1/3-2/3 cup rice
    1-2 tablespoons dried basil
    1-2 teaspoons salt
    1-2 tablespoons dried minced onion, or grated fresh yelllow or red onion
    2-3 cans tomato sauce

  •  

The Method:

Begin by preparing the cabbage. Set out a colander on a large plate next to the stove. Fill a large stock pot half way with water and bring to a boil. While the water is coming to a boil, cut out the core(s) of the cabbage(s) as shown above.

Drop the cabbage in o the boiling water. Adjust the heat to keep the water simmering.

The first outer leaves will fall away easily. Pluck ten out of the water with tongs and place them in the colander to drain.

As you remove leaves, some may begin to cling to the core. You can prevent some of this by enlarging the center of the core you have removed with the knife before boiling, but there will always be some hangers on. Use a carving fork to pry them away.

Like so. As you do this, use the tongs in your other hand to manage the bobbing cabbage head. You can see above that eventually the inner core of the cabbage gets too small to separate the leaves. At this point, let it stay in the water for another few minutes to soften all the leaves left inside. Then pull it out and place it in the colander with all the separated parboiled leaves and allow these to cool as you prepare the filling.

Prepare the filling:

Mix the meat, salt, onion, basil, rice and up a few tablespoons of water thoroughly until all is amalgamated and a smooth mixture is obtained. The basic ratio is 1 teaspoon salt, 1/3 cup uncooked rice, one tablespoon onion and 1 tablespoon basil per one pound meat. Adjust to your taste. I probably use more basil than that. I just keep tossing it in until I like the distribution and scent. The basil is key.

Make the rolls:

Place about 2 tablespoons of the meat mixture at the end of a cabbage leaf. See how nicely it fits in to the natural curve of the leaf.

Begin rolling the leaf, tucking the sides as you go and rolling tightly.

As you approach the end, trim off the thickest part of the rib:

Finish rolling and place in bottom of pot that you have lined with leaves that are either too small or holey or otherwise unsuitable for rolling.

Continue rolling and stack in layers until all the filling is consumed. You should have plenty of leaves left to cover the rolls with extra leaves.

Place an inverted plate atop all.

This prevents the rolls from floating around and unrolling themselves as they cook.

Add tomato sauce and water, one can sauce and 1/2 cup water per pound of meat. Bring to a boil and immediately reduce heat to maintain a simmer. Simmer for 2 hours.

Serve with rice or bulgur pilaf and either pida or wet lavash. What? You’ve never had wet lavash? Huh, well break it in to serving size pieces, run each piece under warm water thoroughly wetting both sides, shake as much of the water off as you can, stack the pieces on a plate, cover with a damp kitchen towel and allow to soften 20 minutes. Now it’s like a tortilla, only better, way better, especially if you roll it with a little butter inside. Take care when removing that plate with tongs before serving the dolmas. We serve it right from the pot so as not to disturb the rolls, but you can remove to a casserole if you’re so inclined.

Cabbage Dolma

Cabbage Dolma is the ultimate winter food, slow, savory, warming. Here’s how:

Ingredients:

  • 2 large heads of green cabbage
  • 2 lbs. lean ground beef
  • 2/3 cup rice
  • 2-4 Tbsp dried minced onion, or equivalent amount of fresh red onion, shredded.
  • 2 tsp. salt
  • 2 Tbsp. dried basil
  • 2 small cans tomato sauce

Method:

Bring a large stock pot 2/3 full of water to the boil.

img_1264-1

Cut the core out of the cabbage with a sharp knife.  Make sure that you have cut out enough of the core that all the leaves are no longer attached at the center.  Then submerge the cabbage in the water and keep at a simmer while you separate all the leaves from the core and transfer them to a colander to drain.  You are par-boiling the leaves, just softening them enough to pull them away from the head using tongs and a large fork and allow later rolling around the meat filling.  They will cook thoroughly later.  Use any torn leaves and the innermost leaves that are too small to form rolls to line the bottom of a 12 quart stockpot.  If you only have one, you’ll have to re-use it after par-boiling the leaves.  Dump the water out of the pot, but preserve it for later.

Mix the meat, salt, rice, onion and basil thoroughly to create the filling.  Add a little water to make it easier to mix everything together.  When everything is thoroughly mixed together, begin rolling the leaves around the filling, placing about 2 Tablespoons of filling on a leaf with the thick end of the leaf facing away as shown:
img_1266

Roll the cabbage leaf around the filling, tucking the sides over as you roll.  When you reach the thick end of the leaf, cut away any part that is too thick to roll.  Some leaves are so large you have to cut them down the middle.  Some are too small.  This one is just perfect and will probably not require any trimming but will form a nice, neat roll.  Place rolls closely packed together in the stockpot as you work.  When the bottom of the pot is covered with rolls, make another layer, and another until you run out of meat.  You shouldn’t run out of leaves.  If you do, you’ve not put enough filling in each leaf.

Pour the tomato sauce over the rolls.  Cover the rolls with any leftover leaves.   Add enough of the cabbage water or fresh water to just barely cover the rolls. Place a sturdy stoneware salad plate upside down over the rolls and gently press down.  This serves as a weight to prevent the rolls from floating around and coming undone.  Cover with the lid of the stockpot.  Bring to a boil.  Reduce heat and simmer for 1.5-2 hours.  When done, you will have to carefully remove that plate before serving directly from the pot or transferring the rolls and plenty of the cooking juice to a serving bowl or deep platter.  That plate is covered with tomato sauce and looks like it will never be the same again, but a trip through the dishwasher will put things right unless the plate is cracked or chipped in which case it’s time to toss it anyway.

Serve with Bulgur Pilaf, wet Lavash (run your pieces of dry lavash under warm water on both sides, stack on a plate and cover with a damp kitchen towel for 20 minutes) and Greek Style Yogurt (made into Tsatsiki-style sauce if you like) for a real traditional Armenian meal.

Okay, Bulgur Pilaf:

Bring 1.5 cups of water, 3/4 tsp. salt, 1 Tbsp. dried minced onion and 1 Tbsp olive oil or butter to a boil.  Add 1 cup of coarse Bulgur (#4).  Allow to return to a boil.  Stir, cover and reduce heat to a simmer.  Simmer for 25 minutes.